This tutorial will explain how to install windows xp with usb drive. You will learn with screenshots to make make bootable usb and copy windows xp installer.
If you are thinking to install xp from usb boot. Then you are at right place. I’ll show step by step how to boot windows xp from usb. Installing windows xp with usb is very simple. All screenshots are given to show you how to install windows xp. You’ll only need windows XP iso or windows XP CD. Secondly a usb drive of at least 1 GB is required for windows xp on usb.
» Once the software is opened Follow below screenshot. If you have windows XP ISO then mount image to Virtual drive using ultraISO. If ultraiso is not installed, then you can download ultraiso from here. Otherwise, if you have Windows XP CD then insert into your CD-Room.
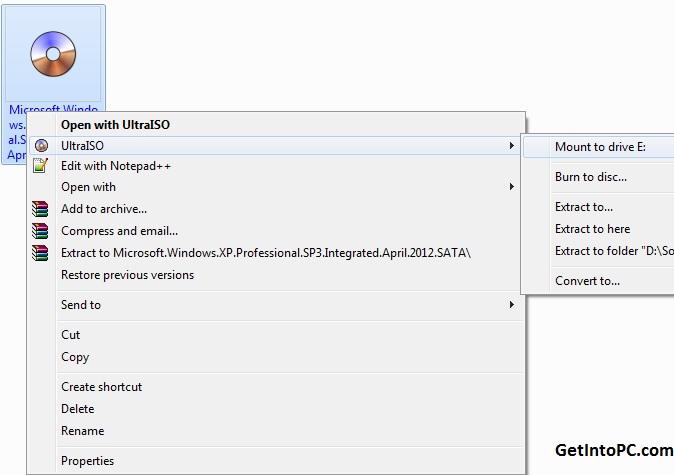
» The WinToFlash supports both CD and ISO File to be read as disk image and copy that to drive letter. The procedure is mentioned in below screenshot.
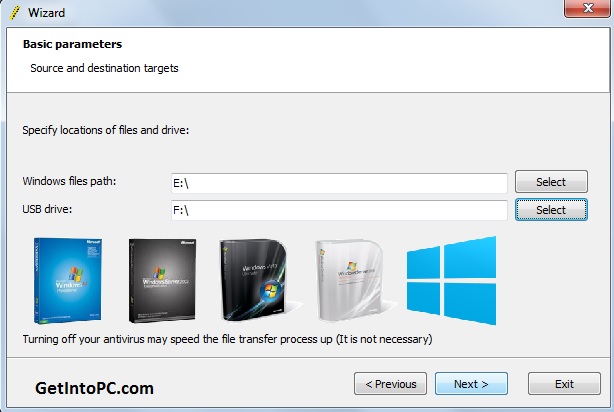
For example: in my case Drive E contains Windows XP ISO image mounted (where as F drive is my usb), then click Next button and your USB pen drive will be formatted. This tool will make usb bootable and will install windows XP on usb drive. Once the process is 100% then you can reboot computer and boot Windows XP from USB.
If you hit any errors during installation of Windows XP via USB then please comment here. This tool also supports installation of Windows 8 and Windows 7. However you can also find complete tutorial to to install windows 8 from USB and Windows 7 from USB.
If you are thinking to install xp from usb boot. Then you are at right place. I’ll show step by step how to boot windows xp from usb. Installing windows xp with usb is very simple. All screenshots are given to show you how to install windows xp. You’ll only need windows XP iso or windows XP CD. Secondly a usb drive of at least 1 GB is required for windows xp on usb.
How To install Windows XP From USB
You’ll need WinToFlash tool to make bootable USB and install windows xp from usb.Download Windows XP SP3 ISO
If you don’t have windows XP iso then you can download free windows XP SP2 ISO from here.Easy Steps to Install Windows XP With USB Drive
» Open WinToFlash software this will help you to install windows XP.
» Once the software is opened Follow below screenshot. If you have windows XP ISO then mount image to Virtual drive using ultraISO. If ultraiso is not installed, then you can download ultraiso from here. Otherwise, if you have Windows XP CD then insert into your CD-Room.

» The WinToFlash supports both CD and ISO File to be read as disk image and copy that to drive letter. The procedure is mentioned in below screenshot.

For example: in my case Drive E contains Windows XP ISO image mounted (where as F drive is my usb), then click Next button and your USB pen drive will be formatted. This tool will make usb bootable and will install windows XP on usb drive. Once the process is 100% then you can reboot computer and boot Windows XP from USB.
If you hit any errors during installation of Windows XP via USB then please comment here. This tool also supports installation of Windows 8 and Windows 7. However you can also find complete tutorial to to install windows 8 from USB and Windows 7 from USB.


